Slash energy bills with this empowering DIY home energy audit guide:
- Inspect insulation, weather-stripping, and air sealing to pinpoint inefficiencies driving up heating and cooling costs.
- Scrutinize appliance energy ratings and usage patterns to identify power-hungry culprits ripe for upgrading or smarter scheduling.
- Track down phantom loads from electronics in standby mode and streamline with smart power strips for effortless savings.
- Call in a professional for a comprehensive assessment if DIY solutions fall short of taming utility bills.
Take charge of your home’s energy efficiency and unlock substantial savings with this expert-level audit roadmap in hand. Implement these strategies to start seeing real reductions in your monthly expenses today.
Gather Your Tools
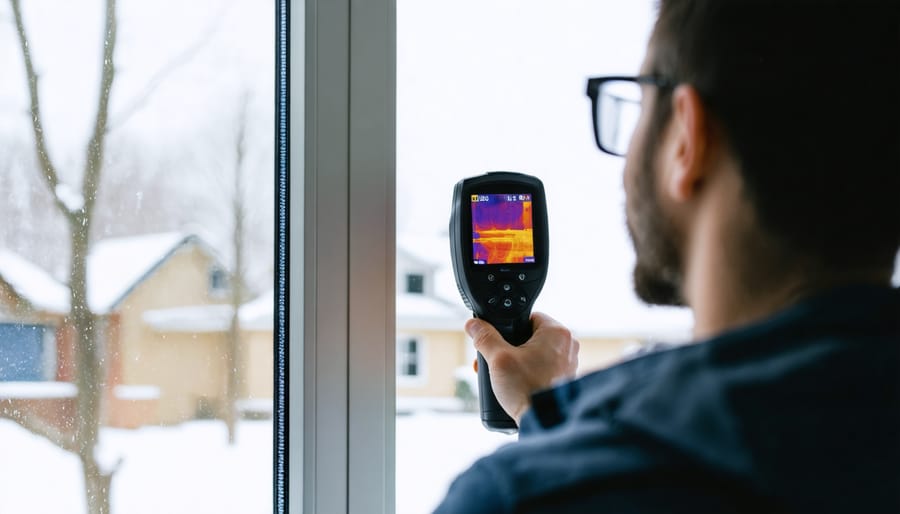
Before you begin your DIY home energy audit, gather a few essential tools. Most of these are common household items that you likely already have on hand. A digital thermometer will help you check temperatures in different rooms and identify hot or cold spots. A moisture meter, available at most hardware stores, can detect hidden moisture issues that lead to energy loss. Bring a bright flashlight to inspect dark corners, attics, and crawlspaces for air leaks or insulation gaps.
Grab a notepad and pen to jot down your findings as you go. A simple stick of incense can work as a DIY smoke pencil to locate drafts around windows and doors. If you want to get more advanced, consider investing in an inexpensive thermal leak detector that visually shows temperature variations using color. Finally, make sure your smartphone is charged – you’ll want to snap photos of problem areas to reference later. With these tools ready, you’re all set to start sleuthing out energy inefficiencies in your home.


Inspect Your Insulation
Inspecting your home’s insulation is a crucial step in any DIY energy audit. Start by checking your attic, as this is where the most significant heat loss often occurs. Look for any gaps or spaces where insulation is missing, compressed, or damaged. Ensure there is a consistent layer of insulation covering the entire attic floor, including the spaces between joists. If you notice any moisture or signs of water damage, address the issue promptly to prevent mold growth and further insulation deterioration.
Next, assess your wall insulation. While this can be more challenging to inspect, there are a few telltale signs of inadequate insulation. Feel for cold spots or drafts along the walls, particularly around electrical outlets and window frames. If you have an infrared thermometer, use it to detect temperature variations that may indicate poor insulation.
Don’t forget to check your floor insulation, especially if you have a crawl space or an unfinished basement. Ensure there is a sufficient layer of insulation between the floor joists, paying close attention to the perimeter where the floor meets the exterior walls.
If you discover areas with insufficient insulation, there are several DIY solutions you can implement. For attics, consider adding loose-fill or batt insulation to achieve the recommended R-value for your climate zone. Use expanding foam to fill small gaps and cracks around windows, doors, and plumbing penetrations. For larger projects, such as adding wall insulation, it may be best to consult with a professional to ensure proper installation and avoid potential moisture issues.
Examine Windows and Doors
Windows and doors are common culprits for air leaks, leading to higher energy bills and reduced comfort. To identify leaks, stand inside on a windy day and hold a lit incense stick near the edges of windows and doors. If the smoke wavers or is sucked outside, you’ve found a leak. Pay close attention to gaps in weatherstripping, particularly on older windows and doors. Single-pane windows are also notorious energy wasters, allowing heat to easily transfer between your home and the outdoors.
Fortunately, there are several low-cost solutions to address these issues. Caulking is an easy and effective way to seal small gaps and cracks around window and door frames. Weatherstripping can be applied to the edges of doors and windows to create a tight seal when closed. For single-pane windows, consider installing window film – a clear plastic sheet that adds insulation and reduces drafts. These simple DIY measures can significantly improve your home’s energy efficiency.
For more substantial upgrades, replacing old windows with energy-efficient models or adding eco-friendly insulation can yield even greater savings. However, these projects often require professional installation and a larger upfront investment. By identifying and addressing air leaks in your windows and doors, you can take the first steps towards a more energy-efficient home and lower utility bills.
Assess Appliances and Electronics
Assessing the age, condition, and efficiency of major appliances and your HVAC system is a crucial step in your DIY home energy audit. Start by examining your refrigerator, dishwasher, washing machine, dryer, and any other large appliances. If any of these are more than 10-15 years old, they may be significantly less efficient than newer, Energy Star certified models. Look for the Energy Star label, which indicates that the appliance meets strict energy efficiency guidelines set by the U.S. Environmental Protection Agency.
Next, inspect your heating, ventilation, and air conditioning (HVAC) system. Check the age of your furnace and air conditioner, as well as the condition of the ductwork. If your HVAC system is more than 15-20 years old, it may be time to consider a more efficient replacement. Regular maintenance, such as changing air filters and having professional tune-ups, can also help improve the efficiency of your HVAC system.
Finally, be on the lookout for “vampire” energy users – devices that continue to draw power even when turned off. Common culprits include televisions, DVD players, gaming consoles, and phone chargers. Use a power strip to easily switch off these devices when not in use, or unplug them entirely to eliminate standby power consumption. By assessing your appliances and electronics, you can identify areas where energy-efficient upgrades or habit changes can lead to significant savings on your utility bills.
Analyze Past Utility Bills
Tracking your energy use and costs over time is a key component of conducting a DIY home energy audit. Start by gathering your utility bills from the past 12-24 months. Look for trends in your energy consumption and costs, noting any significant spikes or dips. Compare your usage and costs to the same month in previous years to account for seasonal variations.
When analyzing your bills, pay attention to the total energy consumed (usually measured in kilowatt-hours for electricity and therms for natural gas) and the associated costs. Look for any unexpected increases that don’t align with changes in your household or lifestyle. These could be red flags indicating energy waste from inefficient appliances, HVAC systems, or poor insulation.
Also, review any additional fees or charges on your bills, such as peak demand charges or renewable energy fees. Understanding these components can help you identify areas where you might be able to save by shifting your energy use to off-peak hours or exploring alternative energy options like renewable energy projects.
Finally, consider using online tools or apps provided by your utility company to track your energy use in real-time. This can help you identify patterns and pinpoint specific areas of energy waste, allowing you to take targeted steps to improve your home’s efficiency and reduce your utility costs.
Create an Action Plan
Based on your home energy audit findings, prioritize the energy efficiency upgrades that will give you the most bang for your buck. Simple DIY fixes like sealing air leaks around windows and doors, installing weatherstripping, and adding insulation to your attic can significantly reduce energy waste. Switching to LED light bulbs, installing low-flow showerheads and faucets, and using smart power strips can also help lower your utility bills. For bigger investments, consider upgrading to Energy Star certified appliances, installing a programmable thermostat, or adding solar panels. Keep an eye on your energy usage with energy monitor hacks to track your progress. While many energy-saving measures are DIY-friendly, know when to call in a professional for complex upgrades like HVAC system replacements or major insulation projects. By focusing on the most cost-effective improvements first, you can maximize your energy savings and see a strong return on your investment.
Conclusion
Conducting a DIY home energy audit is a smart way to identify areas where your home is wasting energy and money. By following the steps outlined in this guide, you can uncover potential issues and implement simple solutions to improve your home’s energy efficiency. Even small changes like sealing air leaks, adjusting thermostat settings, and upgrading to energy-efficient appliances and eco-friendly home upgrades can make a big difference in reducing your utility bills and increasing comfort. Start your own DIY energy audit today and take control of your home’s energy use. Your wallet and the environment will thank you.